Sunday, December 19, 2010

Posted by SAMAJ SHEKHAR

1”

Get current desktop theme


Recently i answered to a question at StackOverflow , where user wanted to know which desktp theme is currently is set on his computer. I thought that it could be a good post so i am posting that code here too.

What it simply does is that it looks for the Currently set theme in the windows registry and returns it as a string.

The current theme is stored in the CurrentTheme string in

HKEY_CURRENT_USER\Software\Microsoft\Windows\CurrentVersion\Themes

Following is the code:

using Microsoft.Win32;

public string GetTheme()
{
  string RegistryKey = @"HKEY_CURRENT_USER\Software\Microsoft\Windows\CurrentVersion\Themes";
  string theme;
  theme = (string) Registry.GetValue(RegistryKey, "CurrentTheme", string.Empty);
  theme = theme.Split('\\').Last().Split('.').First().ToString();
  return theme;
}
READ MORE - Get current desktop theme

Wednesday, December 15, 2010

Posted by SAMAJ SHEKHAR

1”

Creating a Facebook like badge


This a small walkthrough of how you can go about creating a Bage just like Facebook Badge.

Infact While developing my project i myself thought of creating a facebook like badge that can later be saved on the server and used with a link to it. Following is the complete class code to generate the badge(Its also available on codeplex, and following is basically explaination of code there).

(Note: replace the"Image.FromFile(@"C:\Users\SHEKHAR\Desktop\Test HTML\tsp1.png");" with a path to image that can be used as a title bar in the badge.)

The Badge Class

First Declare the Class and some variables to hold on required information. (made it sealed so it couldn't be inherited).

public sealed class TSPBadge
{
 /// <summary>
 /// Image for the TSP badge's title bar (Static Field)
 /// </summary>
 private static Image TSPBadgeTitleBar = Image.FromFile(@"C:\Users\SHEKHAR\Desktop\Test HTML\tsp1.png");

 /// <summary>
 /// The Default Width for TSP Badge (Constant Field)
 /// </summary>
 public const int DBadgeWidth = 300;

 /// <summary>
 /// The Default Height for TSP Badge (Constant Field)
 /// </summary>
 public const int DBadgeHeight = 500;

 /// <summary>
 /// Set this variable to true if a TSP badge has been successfully made
 /// </summary>
 public bool IsMade = false;

 /// <summary>
 /// Initializes the static members of the TSPBadge Class (Static Constructor)
 /// </summary>
}
Class Constructors

Now lets define both static and instance constructors.

/// <summary>
/// Initializes the static values of TSPBadge with default values
/// </summary>
static TSPBadge()
{
BadgeWidth = DBadgeWidth;
BadgeHeight = DBadgeHeight;
}

/// <summary>
/// Initializes a new Instance of TSPBadge with default values
/// </summary>
public TSPBadge()
{
 IsMade = false;
 UserPic = null;
 UserName = null;
 EmailID = null;
 UserStatus = null;
}

/// <summary>
/// Initializes a new Instance of TSPBadge with specified Width and Height
/// </summary>
/// <param name="Width">The Width for the TSP Badge</param>
/// <param name="Height">The Height for the TSP Badge</param>
public TSPBadge(int Width, int Height)
{
 BadgeWidth = Width;
 BadgeHeight = Height;
}

/// <summary>
/// Initializes a new Instance of TSPBadge with specified Image, Name, Status and EmailID.
/// </summary>
/// <param name="userpic">The user's picture</param>
/// <param name="username">The name of the user</param>
/// <param name="emailID">The user's EmailID</param>
/// <param name="userstatus">The user's most recent status text</param>
public TSPBadge(Image userpic, string username, string emailID, string userstatus)
{
 IsMade = false;
 UserPic = new Bitmap(userpic);
 UserName = username.ToUpper(CultureInfo.InvariantCulture);
 EmailID = emailID;
 UserStatus = userstatus;
}
Properties

Following are defination of some properties that will help you to alter the settings when required.

/// <summary>
/// Gets or Sets the Width to be used for drawing TSP badge. (Static Property)
/// </summary>
public static int BadgeWidth { get; set; }

/// <summary>
/// Gets or Sets the Height to be used for drawing TSP badge. (Static Property)
/// </summary>
public static int BadgeHeight
{
 get
 {
  return _BadgeHeight;
 }
 set
 {
  GraphicsUnit gu = GraphicsUnit.Pixel;
  //The TSP Badge's Minimum height is the height of TSP TitleBar's height
  if (value <= (int)TSPBadgeTitleBar.GetBounds(ref gu).Height)
  {
   _BadgeHeight = (int)TSPBadgeTitleBar.GetBounds(ref gu).Height;
  }
  else
  {
   _BadgeHeight = value;
  }
 }
}
private static int _BadgeHeight;

/// <summary>
/// Gets or Sets the User Picture to be used for drawing TSP Badge
/// </summary>
public Bitmap UserPic { get; set; }

/// <summary>
/// Gets or Sets the User Name to be used for drawing TSP Badge
/// </summary>
public string UserName { get; set; }

/// <summary>
/// Gets or Sets the User EmailID to be used for drawing TSP Badge
/// </summary>
public string EmailID { get; set; }

/// <summary>
/// Gets or Sets the User's Status text to be used for TSP Badge
/// </summary>
public string UserStatus { get; set; }
Methods for drawing

Lets draw the badge!

/// <summary>
/// Draws a TSP Badge on bitmap with specified Image, Name, Status and EmailID. (Static Method)
/// </summary>
/// <param name="userpic">The user's picture</param>
/// <param name="username">The name of the user</param>
/// <param name="emailID">The user's EmailID</param>
/// <param name="userstatus">The user's most recent status text</param>
/// <returns>Returns an  TSP Badge as an Bitmap Image</returns>
public static Bitmap MakeBadge(Image userpic, string username, string emailID, string userstatus)
{
 Bitmap bmp = new Bitmap(BadgeWidth, BadgeHeight);
 Graphics gf = Graphics.FromImage(bmp);
 GraphicsUnit gu = GraphicsUnit.Pixel;
 string BatchString = String.Format("{0}\n\nEMAIL:  {1}\n\nSTATUS:  {2}", username.ToUpper(CultureInfo.InvariantCulture), emailID, userstatus);
 //We are taking 60% of the bitmap space for User picture - (int)((float)BadgeHeight * (60F / 100F))
 //Write status, name etc in rest of 40% bitmap space
 float PicPer = 60F;
 float RstPer = 100F - PicPer;
 gf.Clear(Color.White);
 gf.DrawImage(userpic, new Rectangle(2, 2, BadgeWidth - 4, (int)((float)BadgeHeight * (PicPer / 100F)))); //NOTE: The rectangle here takes a non-zero based width/height so 300
 gf.DrawImage(TSPBadgeTitleBar, new Rectangle(0, 0, BadgeWidth, (int)TSPBadgeTitleBar.GetBounds(ref gu).Height));
 //TODO: Insert code to check name dosen't go out of title bar and get trimmed
 gf.DrawString(username.ToUpper(CultureInfo.InvariantCulture), new Font(new FontFamily("Arial"), 10F), Brushes.White, new PointF(5, 6));
 gf.DrawRectangle(Pens.Black, 0, 0, BadgeWidth - 1, BadgeHeight - 1); //NOTE: DrawRectangle takes a 0 based width/height so 300-1
 gf.DrawRectangle(Pens.Black, 1, 1, BadgeWidth - 3, ((int)((float)BadgeHeight * (PicPer / 100F))) + 1);
 gf.DrawRectangle(Pens.Black, 1, ((int)((float)BadgeHeight * (PicPer / 100F))) + 3, BadgeWidth - 3, ((int)((float)BadgeHeight * (RstPer / 100F))) - 5);
 gf.DrawString(BatchString, new Font(new FontFamily("Arial"), 10F), Brushes.Black, new RectangleF(5, ((int)((float)BadgeHeight * (PicPer / 100F))) + 6, BadgeWidth - 7, ((int)((float)BadgeHeight * (RstPer / 100F))) - 5), StringFormat.GenericTypographic);
 return bmp;
}

Now lets add some more methods in the class to make the MakeBadge static method accessible to instance methods and customizable too.

/// <summary>
/// Draws a TSP Badge on bitmap.
/// <para>NOTE: This function requires that all the requiremens are set already other wise it returns a null bitmap</para>
/// </summary>
/// <returns>Returns an  TSP Badge as an Bitmap Image</returns>
public Bitmap GetBadge()
{
 IsMade = false;
 Bitmap bmp = null;
 if (UserPic != null && UserName != null && EmailID != null && UserStatus != null)
 {
  bmp = TSPBadge.MakeBadge(UserPic, UserName, EmailID, UserStatus);
  IsMade = true;
 }
 return bmp;
}

/// <summary>
/// Draws a TSP Badge on bitmap with specified Image, Name, Status and EmailID.
/// </summary>
/// <param name="userpic">The user's picture</param>
/// <param name="username">The name of the user</param>
/// <param name="emailID">The user's EmailID</param>
/// <param name="userstatus">The user's most recent status text</param>
/// <returns>Returns an  TSP Badge as an Bitmap Image</returns>
public Bitmap GetBadge(Image userpic, string username, string emailID, string userstatus)
{
 IsMade = false;
 UserPic = new Bitmap(userpic);
 UserName = username.ToUpper(CultureInfo.InvariantCulture);
 EmailID = emailID;
 UserStatus = userstatus;
 Bitmap bmp = TSPBadge.MakeBadge(UserPic, UserName, EmailID, UserStatus);
 IsMade = true;
 return bmp;
}

That's all Happy Coding :)

READ MORE - Creating a Facebook like badge

Tuesday, October 12, 2010

Posted by SAMAJ SHEKHAR

0

IE9 is here, So.. what's in for you as a Developer


After so many years of developers wishing for a better browser from Microsoft, one that was more consistent with web standards and would allow them to develop cross-browser websites leveraging the same markup, today marks the day that developers finally have that browser; Internet Explorer 9 Beta. It’s an important day because this release, although just a beta, is the culmination of a lot of effort and most importantly, listening, by the Internet Explorer team.
While the Internet Explorer browser has enjoyed widespread adoption by consumers, it hasn’t always been viewed fondly by the development community. The important work of building cross-browser compliant websites has often been cumbersome, due in part to differing interpretations of browser APIs in previous versions of Internet Explorer. The differences forced developers, myself included, to find workarounds for functionality that, in many cases, had a clearly defined standard behavior.

HTML5, CSS3, DOM

With Internet Explorer 9, there’s been a concerted effort by Microsoft to focus on standards-based functionality that will ease cross-browser development while providing the features needed to build rich and immersive websites. Take, for example, IE9’s support for many of the features of HTML5 and CSS3, the specifications which are defining the future of the web. By including support for features such as Canvas, video, @font-face, CSS3 media queries, SVG and many others, we now have a rich base to provide more compelling experiences to end users. In addition, by ensuring that these features are conformant to the defined specifications, the sites we build should work with any browser that also supports those specifications.
To take it a step further, the IE team has enhanced the performance of many of the new HTML5 features by taking advantage of the GPU. This means that text, graphics and video will be substantially smoother and more responsive allowing websites to perform more like true applications.
And at the DOM level, important changes have been made to be consistent with the defined specifications making it easier to whittle down browser-specific code. For example, support for the W3C DOM Events specification (addEventListener & removeEventListener) in place of the proprietary IE model (attacheEvent & detachEvent) has been one of the most welcomed changes to IE9 as has the introduction of getElementsByClassName, supported for some time in the DOM Level 2 specification and now available in IE9.

JavaScript

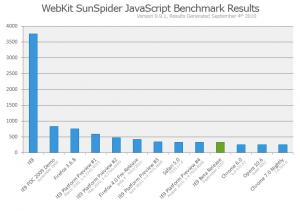
Equally important is the performance boost provided by the new Chakra JavaScript engine which basically blows away older versions of Internet Explorer and brings IE9 in line with modern browsers such as Chrome, Firefox and Opera. JavaScript development continues to become more complex and intricate so the importance of these performance enhancements can’t be understated. The Chakra engine interprets, compiles, and executes code in parallel and takes advantage of multiple CPU cores when available and the results are obvious by the greatly improved benchmark scores from the Webkit Sunspider JavaScript Benchmarks.

Chakra JavaScript Engine – WebKit SunSpider Benchmarks

Updated Developer Tools

Substantial work has been done to update the Internet Explorer Developer Tools. The built-in tools, usually found by pressing F12, provided quite a bit of capabilities but were missing key components that were essential to effective testing and debugging of client-side source code. With this update, the tools now include a much anticipated network traffic inspector, Console tab, CSS editing, and an improved JavaScript profiler.
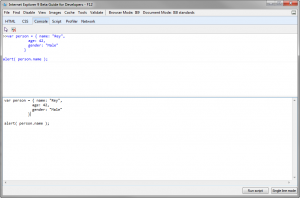
The new Console tab is a welcome addition providing the ability to inspect script easily as well as receive important page-specific error and warning messages.

IE Developer Tools – Console Tab
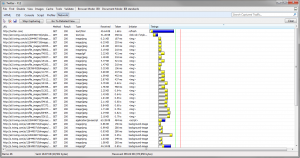
Of the new features, the one that I’m most excited about is the network traffic inspector, mainly because the bulk of my application development involves Ajax-based requests.

IE Developer Tools – Network Performance of Specific Assets

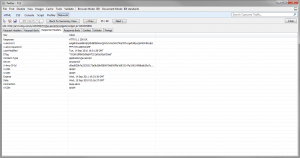
IE Developer Tools – Network Request Information
I can now do such things as determine load times of specific assets or inspect my request/response headers, cookies and return values without the need for breaking out of the browser to a 3rd party application such as Fiddler or Charles.

Get to Using it Today

A lot of effort has gone into making Internet Explorer 9 Beta a better browser. There’s certainly more work to be done but the fact that we now have a version of IE that provides standards-based functionality and allows us to use the same markup across browsers is pretty hot.
To really appreciate what you can build with IE9, though, you need to just start digging into it. Microsoft has created the following sites to give developers the knowledge and inspiration they need to leverage IE9 to its fullest:

  • Beauty of the Web – Explore all of the new features of Microsoft’s latest browser and check out the cool demos built using the advanced features of Internet Explorer 9 Beta
  • Internet Explorer 9 Test Drive – This site breaks down the new, advanced features of Internet Explorer 9 Beta and lets you get a visual of what’s possible with each bit of functionality
  • Internet Explorer Guide for Developers – The developer documentation you’ll need to learn how about the specifics of Internet Explorer 9 Beta


It feels great to know that we’re on a path to being able to build truly feature-rich websites that will be easier to maintain and provide a more exciting experience to users. While we’ll still need to support older browsers for some time, the fact that all the major browser vendors are heading in the same direction is going to allow us to build some truly amazing things. I can’t wait!

Post originally taken from Here
READ MORE - IE9 is here, So.. what's in for you as a Developer

Saturday, October 2, 2010

Posted by SAMAJ SHEKHAR

2

Silverlight or HTML5, Who wins!!!!


First sorry for being so late with my next post, i was little busy with my course project for NIIT. Secondly this post was supposed to be something about ADO.Net, but since i got my project , which has to be a web application, i myself was fiddling with the decision whether to use HTML5 or Silverlight for much   richer part of my application as now many browsers have started to support HTML5, even IE.

There is already a lot of fuss in Developer community on this topic. Every now and then, someone asks me, "Which technology will win: HTML5 or Silverlight?", or "What is Silverlight's strategy to compete with HTML5?".
I always have to take a deep breath before responding, because these questions presuppose something that doesn't make any sense to me. It's like asking a tool store owner, "Which will win, hammers or screwdrivers?", or "How will you prevent hammers from making screwdrivers obsolete?"

Black-and-white Thinking

Some important folks in the industry have argued that HTML5 is a Silverlight-killer, or that Silverlight exists to prevent HTML from advancing. These are dramatic claims that only heighten conflict in an industry afflicted by fictionalized Zarathustrian "black versus white" stories.

The Right Tool for the Job

Microsoft ships the world's most popular HTML client. Despite the HTML5 specification being a work in progress, we implemented several HTML5 features in our most recent browser. Microsoft has co-chaired the HTML5 working group in W3C since its inception, and we remain active participants. And our browser will continue to be the dominant HTML standards implementation for the foreseeable future.
Likewise, we continue to invest heavily in Silverlight development and deployment. If Silverlight and HTML are mortally opposed, as the story goes, we must be crazy to invest so heavily in both, right? Wrong.
The truth is, Microsoft is a developer company, and there is no one-size-fits-all, perfect tool for every development job. Can anyone seriously criticize us for investing in C#, JavaScript, and Ruby and Python (among other languages)? No! Our customers should be able to use the right tool for the job at hand.
As with development languages, there is no single development platform for every job. HTML5 will be fantastic for some scenarios, while Silverlight will be great for others. Besides Internet Explorer and Silverlight, we ship a bunch of other platforms, including XNA and DirectX for game developers, WPF and .NET, Win32, and others. We have the depth and breadth to be best in class, no matter what platform developers want to use.

Opportunism vs. Reality

So, why do certain people propagate this myth? Do they really want a monoculture world where there is only one platform for every job? Or are they truly arguing from an idealistic or religious viewpoint, as some of their arguments would suggest?
In my opinion, it's a lot simpler than all of that: those who argue that HTML5 will supplant everything else tend to be companies who have nothing else. If you only sell hammers, you might as well try to convince people that there are no such things as screws. And you can drive awareness for your newly-incorporated hammer store by telling tales of intrigue and conflict between hammers and screwdrivers. But the fact that these arguments are often couched in conspiracy theories or ideology, suggests that they are primarily opportunistic marketing ploys, and not motivated by pragmatic technical reality.

What do you think? Leave a comment below, or hit me up on twitter.

Originally Taken from here.
READ MORE - Silverlight or HTML5, Who wins!!!!

Monday, September 13, 2010

Posted by SAMAJ SHEKHAR

1”

Making Any Control Draggable in Silverlight & WPF


Introduction

Silverlight gives you easy access to make your User Controls come alive. For example you can make any control in Silverlight draggable. Here's how:

In your Code add a TranslateTransform inside your layout grid of your user control. The TranslateTransform will allow you to move your grid along the x and y coordinates of your application

Listing 1 - Adding the TranslateTransform to your control
<Grid x:Name="LayoutRoot" >
        <Grid.RenderTransform>
            <TransformGroup>
                <ScaleTransform/>
                <SkewTransform/>
                <RotateTransform/>
                <TranslateTransform x:Name="LocalTranslateTransform"/>
            </TransformGroup>
        </Grid.RenderTransform>

Now we want to pick a control inside the UserControl to grab onto. In our sample we will use a Border control. Inside the Border control, we'll add mouse events to handle the various states of dragging with the mouse.

Listing 2 - Hooking up the mouse events to the Border control
<Border x:Name="myToolbar" MouseLeftButtonDown="OnToolbarClicked"
 MouseLeftButtonUp="OnToolbarReleased" MouseMove="OnToolbarMoving"  />
The Code

The XAML part was pretty simple. Now let's look at the code behind. All of the dragging functionality is handled by our 3 event handlers: OnToolbarClicked, OnToolbarReleased, and OnToolbarMoving. When we first click down on the border control, we need to record the initial offset point for our transform. We also need to set the state to mouseDownInToolbar to true to indicate we are dragging. Finally we need to set the mouse mode to capturing inside the border control.

Listing 3 - Handling the mousedown event inside the border
private void OnToolbarClicked(object sender, MouseButtonEventArgs e)
{
    mouseDownInToolbar = true;
    DragOffset = e.GetPosition(LayoutRoot);
    toolbarBorder.CaptureMouse();
}

While the mouse is in the mouseDownInToolbar state, we need to translate the position of the toolbar in reference to the position of the mouse. Listing 4 illustrates how we go about this. We get the position of the mouse relative to the main grid of the control. Then we change the TranslateTransform of the grid based on the new position of the mouse. We also need to offset the current mouse position by the original location of the mouse when we first clicked down in the control. Everytime we move the mouse, the new TranslateTransform will be computed and our control will move to the translated location. The mouse cursor will remain at the point when we first clicked the toolbar.

Listing 4 - handling the dragging of the control while the mouse is moving
private void OnToolbarMoving(object sender, MouseEventArgs e)
{
    if (mouseDownInToolbar)
    {
        // we want to move it based on the position of the mouse
        moveUserControl(e);
    }
}

private void moveUserControl (MouseEventArgs e)
{
    Point mousePos = e.GetPosition(LayoutRoot);
    Double newX = LocalTranslateTransform.X + (mousePos.X - DragOffset.X);
    Double newY = LocalTranslateTransform.Y + (mousePos.Y - DragOffset.Y);
    LocalTranslateTransform.X = newX;
    LocalTranslateTransform.Y = newY;
}

When the user unclicks the mouse, we need to stop the drag process. The MouseUp event handler will release the mouse capture and set the mouseDownInToolbar state to false. This will prevent the toolbar to continue to move as we drag the mouse around the screen.

Listing 5 - Handling Mouse Up when dragging the Toolbar
private void OnToolbarReleased(object sender, MouseButtonEventArgs e)
{
    mouseDownInToolbar = false;
    toolbarBorder.ReleaseMouseCapture();
}
Conclusion

Manipulating size and position of controls is fairly easy in Silverlight with the power of transforms. Dragging a control is accomplished using the TranslateTransform in conjunction with mouse events and functions. You can probably take this a step further and build your own docking framework. Anyway, drag yourself away from conventional controls in Windows and enjoy the power and flexibility of WPF in the browser with Silverlight.

Originally taken from Here
READ MORE - Making Any Control Draggable in Silverlight & WPF

Saturday, August 28, 2010

Posted by SAMAJ SHEKHAR

4

Introduction to using WP7 Accelerometer


This post is about introducing you Windows Phones Accelerometer (I have taken following contents from Charles Petzold's book "Programming Windows Phone 7 - Special Excerpt 2". The contents are Copyright of Microsoft and is used only for informational purpose). You can get more detailed information about using Accelerometer from above mentioned book, complete book is still to be released later this year.

Windows Phones contain an accelerometer — a small hardware device that essentially measures force, which elementary physics tells us is proportional to acceleration. When the phone is held still, the accelerometer responds to the force of gravity, so the accelerometer can tell your application the direction of the Earth relative to the phone. It is convenient to represent the accelerometer output as a vector in three-dimensional space. Vectors are commonly written in boldface, so the acceleration vector can be symbolized as (x, y, z). XNA defines a three-dimensional vector type; Silverlight does not.

While a three-dimensional point (x, y, z) indicates a particular location in space, the vector (x, y, z) encapsulates instead a direction and a magnitude. Obviously the point and the vector are related: The direction of the vector (x, y, z) is the direction from the point (0, 0, 0) to the point(x, y, z). But the vector (x, y, z) is definitely not the line from (0, 0, 0) to (x, y, z). It’s only the direction of that line. The magnitude of the vector (x, y, z) is calculable from the three-dimensional form of the Pythagorean Theorem:

Magnitude = Math.sqrt( Math.pow(x,2), Math.pow(y,2), Math.pow(z,2) )
where:
Math.sqrt() function returns the square root of a number
Math.pow() function returns a number raised to a power
For working with the accelerometer, you can imagine the phone as defining a threedimensional coordinate system. No matter how the phone is oriented, the positive Y axis points from the bottom of the phone (with the buttons) to the top, the positive X axis points from left to right.


When the phone is still, the accelerometer vector points towards the Earth. The magnitude is 1, meaning 1 g, which is the force of gravity on the earth's surface. When holding your phone in the upright position, the acceleration vector is (0, –1, 0), that is, straight down.

So lets start, To use the accelerometer, you’ll need a reference to the Microsoft.Devices.Sensors library, and a using directive for the Microsoft.Devices.Sensors namespace. In WMAppManifest.xml, you need
<Capability Name="ID_CAP_SENSORS">

You create an instance of the Accelerometer class, set an event handler for the
ReadingChanging event, and call Start. And then it gets a little tricky. Let’s take a look at a project named SilverlightAccelerometer project that simply displays the current reading in its content grid. A centered TextBlock is defined in the XAML.

<Grid x:Name="ContentGrid" Grid.Row="1">
    <TextBlock Name="txtblk"
     HorizontalAlignment="Center"
     VerticalAlignment="Center" />
</Grid>

This is a program that will display the accelerometer vector throughout its lifetime, so it creates the Accelerometer class in its constructor and calls Start:

public MainPage()
{
    InitializeComponent();
    Accelerometer acc = new Accelerometer();
    acc.ReadingChanged += OnAccelerometerReadingChanged;
    try
    {
        acc.Start();
    }
    catch (Exception exc)
    {
        txtblk.Text = exc.Message;
    }
}

The documentation warns that calling Start might raise an exception, so the program protects itself against that eventuality. These user-interface objects are not thread safe; they are not built to be accessed simultaneously from multiple threads. For this reason, Silverlight will not allow you to access a user-interface object from a non-UI thread.

This means that the OnAccelerometerReadingChanged method cannot directly access the TextBlock element to set a new value to its Text property. Fortunately, there’s a solution involving a class named Dispatcher defined in the System.Windows.Threading namespace. Through the Dispatcher class, you can post jobs from
a non-UI thread on a queue where they are later executed by the UI thread.

The Dispatcher class defines a method named CheckAccess that returns true if you can access a particular user interface object from the current thread. (The CheckAccess method is also duplicated by DependencyObject itself.) If an object can’t be accessed from the current thread, then Dispatcher provides two versions of a method named Invoke that you use to post the job to the UI thread.

The verbose version requires a delegate and a method defined in accordance with that delegate. The delegate (and method) should have no return value, but as many arguments as you need to do the job, in this case setting a string to the Text property of a TextBlock:
delegate void SetTextBlockTextDelegate(TextBlock txtblk, string text);
void SetTextBlockText(TextBlock txtblk, string text)
{
    txtblk.Text = text;
}
The OnAccelerometerReadingChanged is responsible for calling SetTextBlockText. It first makes use of CheckAccess to see if it can just call the SetTextBlockText method directly. If not, then the handler calls the BeginInvoke method. The first argument is an instantiation of the delegate with the SetTextBlockText method; this is followed by all the arguments that SetTextBlockText requires:
void OnAccelerometerReadingChanged(object sender, AccelerometerReadingEventArgs args)
{
    string str = String.Format("X = {0:F2}\n" +
    "Y = {1:F2}\n" +
    "Z = {2:F2}\n\n" +
    "Magnitude = {3:F2}\n\n" +
    "{4}",
    args.X, args.Y, args.Z,
    Math.Sqrt(args.X * args.X + args.Y * args.Y +
    args.Z * args.Z),
    args.Timestamp);
    if (txtblk.CheckAccess())
    {
        SetTextBlockText(txtblk, str);
    }
    else
    {
        txtblk.Dispatcher.BeginInvoke(new
        SetTextBlockTextDelegate(SetTextBlockText),
        txtblk, str);
    }
}
This is not too bad, but the need for the code to jump across threads has necessitated an additional method and a delegate. Is there a way to do the whole job right in the event handler?
Yes! The BeginInvoke method has an overload that accepts an Action delegate, which defines a method that has no return value and no arguments. You can create an anonymous method right in the BeginInvoke call. The complete code following the creation of the string object looks like this:
if (txtblk.CheckAccess())
{
    txtblk.Text = str;
}
else
{
    txtblk.Dispatcher.BeginInvoke(delegate()
        {
            txtblk.Text = str;
        });
}
The anonymous method begins with the keyword delegate and concludes with the curly
brace following the method body. The empty parentheses following the delegate keyword are not required.


The Windows Phone 7 emulator doesn’t contain any actual accelerometer, so it always reports a value of (0, 0, –1), which indicates the phone is lying on a flat surface:
READ MORE - Introduction to using WP7 Accelerometer

Tuesday, August 10, 2010

Posted by SAMAJ SHEKHAR

0

Invoking C# Compiler from your Code


Imagine you have just generated some code using a code generation technique, wouldn’t it be really cool to then programmatically call the C# language compiler and generate assemblies from the generated code?
Let’s imagine we used an Xslt transformation to generate some code:
XslCompiledTransform transform = new XslCompiledTransform();
transform.Load("Program.xslt");
transform.Transform("Program.xml", "Program.cs");
Using the CSharpCodeProvider class we can now programmatically call the C# compiler to generate the executable assembly. We’ll begin by advising the compiler of some options we’d like it to use when compiling our code using the CompilerParameters class.
CompilerParameters parameters = new CompilerParameters();
We’ll specify that the assembly to be created should be an executable and we’ll also specify such things as whether debug information should be included, the warning level, whether warnings should be treated as errors etc.
parameters.GenerateExecutable = true;
parameters.IncludeDebugInformation = true;
parameters.GenerateInMemory = false;
parameters.TreatWarningsAsErrors = true;
parameters.WarningLevel = 3;
parameters.CompilerOptions = "/optimize";
parameters.OutputAssembly = "Program.exe";
Using the compiler parameters we can now compile the C# code using the CSharpCodeProvider class and get the results of the compilation as an instance of the CompilerResults class.
CSharpCodeProvider codeProvider = new CSharpCodeProvider();
CompilerResults results = codeProvider.CompileAssemblyFromFile(parameters, new string[] { "Program.cs" });
While the code you generated is unlikely to have any compiler warnings or errors, other developers may be less fortunate and therefore they can access the Errors property of the CompilerResults class to determine what went wrong. Actually the Errors property contains both compiler errors and warnings although the following simple LINQ queries allow you to examine the warnings and errors in isolation.
var warnings = from e in results.Errors.Cast()
      where e.IsWarning
      select e;
var errors = from e in results.Errors.Cast()
    where !e.IsWarning
    select e;
While code generation is very cool, we generate code to ultimately create assemblies that we can either execute or reference from other code. If you’re programmatically generating code why not next time also programmatically generate the assemblies too!

Post originally taken from Here
READ MORE - Invoking C# Compiler from your Code

Wednesday, August 4, 2010

Posted by SAMAJ SHEKHAR

1”

Enable Built-in Administrator Account in Windows 7


Hi everybody, recently I was exploring features of windows 7 when I found that administrator account can be enabled and listed among other accounts in the logon screen. We all know in XP we could do so by pressing “Ctrl+Alt+Delete” at the logon screen and entering Administrator as the username and entering required password you entered while installing XP (Most people don’t enter anything, and I used to use this a lot to logon as administrator at Cyber cafes). But in Windows 7 by default you don’t have administrator account listed among other accounts. When you need to elevate the permissions for an application, you usually right click an application and select “Run as Administrator”. Windows do this to prevent any application from running with admin permissions until you want or need so. The account in which you are logged in is a Member of Administrator Group, it is not the Built-in account for administering the computer/domain
(Warning: It is not recommended to enable Administrator account and logging in as Administrator)

So to enable admin account you need to follow following steps (you need administrative rights to perform these steps):

1: Switch to Desktop (if not already) and Right click on “My computer” and click on “Manage”.


2: In Computer Management window that will open, select “Local Users and Groups” under “Computer management \ System Tools”.

3: In the right pane two folders will be visible, Double Click on “Users”


4: Then double click on “Administrator”.

5: In the “Administrator Properties” dialogue box there is a check box labeled “Account is disabled”, uncheck that check box and click on apply.


Close that window and any other open window, now to check that it worked, Logoff or Lock your computer (By pressing Windows Key + L) and click on “Switch user”. You will see Administrator account, you can log into it and enjoy full access to computer with complete admin rights. You can also set a  password for this built in Administrator Account (I would strongly recommend doing so).
READ MORE - Enable Built-in Administrator Account in Windows 7

Saturday, July 31, 2010

Posted by SAMAJ SHEKHAR

0

Windows 7 Service Pack 1 (Beta)


Microsoft continuously collects feedback on Windows 7 from customers and partners through several channels. This feedback results in enhancements that help improve compatibility, reliability, performance, and user experience. Service Pack integrates all these updates, along with additional enhancements, into a single package and help ensure that your systems are up-to-date.
The beta of SP1 for Windows 7 contains the pre-released 17 security updates and 456 hotfixes. The impact of SP1 on Windows 7 is considered to be minimal since it only includes pre-released hotfixes and security updates. Even though the current SP1 release is a beta, Microsoft has made it clear to not anticipate the SP1 for Windows 7 to be substantial. While SP1 is not intended to be a vehicle for releasing new features, some existing features do gain slightly enhanced functionality in SP1.
The SP1 beta has been released in English, French, German, Japanese, and Spanish. This beta will expire on June 30, 2011. You will have to upgrade to a newer build or uninstall and return to the RTM build by that time. Service Pack 1 will be released within the first half of calendar year 2011. You would not be able to upgrade from the beta builds to the final build of SP1 and will have to uninstall the Service Pack or do a clean install of Windows 7.
Setup Prerequisites:

  • Your current operating system must be the Release to Manufacturing (RTM) version of Windows 7 (build 7600).

  • Users updating through Windows Update/WSUS must install the Servicing Stack Update (SSU). This update is necessary to successfully install or uninstall the service pack.
Delivery Methods:
  • Standalone Package
    Meant for commuters without internet access or system administrators.
    About 297 MB (x86) or 535 MB (x64) of download size.
  • Windows Update
    Meant for most home or many business users.
    About 23 MB (x86) or 45 MB (x64) of download size.
  • Integrated DVDMeant for new PCs or Vista upgrades
Changes in Windows 7 SP1
  • Additional support has been added to allow Windows 7 clients to effectively communicate with third-party identity federation services.
  • Improved HDMI audio device performance.
  • Corrected behavior when printing mixed-orientation XPS documents using the XPS Viewer.
  • Change to behavior of “Restore previous folders at logon” functionality. All folders are restored to their previous positions rather than the cascaded position based on the location of the most recently active folder.
  • Enhanced support for additional identities in RRAS and IPsec.
  • Support for Advanced Vector Extensions (AVX).
for more information & processes: http://www.thewindowsclub.com/whitepaper-windows-7-service-pack-1
READ MORE - Windows 7 Service Pack 1 (Beta)

Friday, July 23, 2010

Posted by SAMAJ SHEKHAR

1”

Windows Sidebar Gadget's Manifest's Schema


While developing my app (see previous post) i came across a need to validate my generated xml with a schema. I searched around the internet but couldn’t find any schema for the Windows Sidebar Gadget.xml. Many people were asking for one various forums but they got no reply. I needed it too so i thought why not create one for myself, since i didn't knew much about creating xml schemas so referenced some websites and wrote the following schema in Visual Studio. Using Visual Studio made it all easier for me to write a schema cause it helped me by automatically completing and closing tags and it also suggested various attributes i can set, through its "intellisense".  Visual Studio obviously boosts productivity and makes learning new things easy.
Following is the schema code for the Windows sidebar gadget’s manifest.


<?xml version="1.0" encoding="utf-8"?>
<xs:schema id="SidebarGadget"
              xmlns:xs="http://www.w3.org/2001/XMLSchema">
  <xs:element name="gadget" type="Tgadget"/>
  <xs:complexType name="Tgadget">
    <xs:sequence maxOccurs="1">
      <xs:element name="name" type="xs:string"/>
      <xs:element name="namespace" type="xs:string"/>
      <xs:element name="version" type="xs:string"/>
      <xs:element name="author" type="Tauthor"/>
      <xs:element name="copyright" type="xs:string"/>
      <xs:element name="description" type="xs:string"/>
      <xs:element name="icons" type="Ticons" maxOccurs="unbounded"/>
      <xs:element name="hosts" type="Thosts"/>
    </xs:sequence>
  </xs:complexType>
  <xs:complexType name="Tauthor">
    <xs:sequence>
      <xs:element name="info" type="Turl"/>
      <xs:element name="logo" type="Tlogo"/>
    </xs:sequence>
    <xs:attribute name="name" type="xs:string"/>
  </xs:complexType>
  <xs:complexType name="Turl">
    <xs:attribute name="url" type="xs:string"/>
  </xs:complexType>
  <xs:complexType name="Tlogo">
    <xs:attribute name="src" type="xs:string"/>
  </xs:complexType>
  <xs:complexType name="Ticons">
    <xs:sequence>
      <xs:element name="icon" type="Ticon"/>
    </xs:sequence>
  </xs:complexType>
  <xs:complexType name="Ticon">
    <xs:attribute name="hight" type="xs:nonNegativeInteger"/>
    <xs:attribute name="width" type="xs:nonNegativeInteger"/>
    <xs:attribute name="src" type="xs:string"/>
  </xs:complexType>
  <xs:complexType name="Thosts">
    <xs:sequence>
      <xs:element name="host" type ="Thost"/>
    </xs:sequence>
  </xs:complexType>
  <xs:complexType name="Thost">
    <xs:sequence>
      <xs:element name="base" type="Tbase"/>
      <xs:element name="permission" type="xs:string"/>
      <xs:element name="platform" type="Tplatform"/>
      <xs:element name="autoscaleDPI" type="xs:boolean" nillable="true"/>
      <xs:element name="defaultImage" type="TdefaultImage"/>
    </xs:sequence>
    <xs:attribute name="name" type="xs:string" default="sidebar"/>
  </xs:complexType>
  <xs:complexType name="Tbase">
    <xs:attribute name="type" type="xs:string"/>
    <xs:attribute name="apiVersion" type="xs:string"/>
    <xs:attribute name="src" type="xs:string"/>
  </xs:complexType>
  <xs:complexType name="Tplatform">
    <xs:attribute name="minPlatformVersion" type="xs:double"/>
  </xs:complexType>
  <xs:complexType name="TdefaultImage">
    <xs:attribute name="src" type="xs:short"/>
  </xs:complexType>
</xs:schema>
 
I hope this could be useful to someone who need it and don't have time to make one.
Comments or suggestion are welcome...


READ MORE - Windows Sidebar Gadget's Manifest's Schema